
Open Source Free/Low Cost Geospatial Stack on AWS with SSL
First published on 19.5.2019
It is not always as easy as we think to figure out how to create a production ready SSL enabled backend environment for web mapping & GIS purposes (i.e. geospatial stack). Providing SSL requires special attention since web mapping libraries like Leaflet.js require this protocol to display data on the map with no issue. After spending some time to get things together and build a backend with Geoserver + PostGIS, streamed through SSL, I’ve got some experience which I think will be beneficial for those who are in need of building something similar at minimum cost.
Shortly, this step-by-step guide would aim to explain:
- Creating a web geospatial stack consisting PostGIS and Geoserver
- How to utilize Amazon Web Services (AWS) with minimum cost in production environment
- Securing the connection of deployments with a free SSL certificate, again with the help of AWS
To start with, first head to AWS’s website and create a new user account for yourself. Secondly, get a domain name(no matter which provider) to utilize while enabling SSL.
For those of you who have a student e-mail, I would recommend to apply for a Github student pack and activate free credits given to use AWS. Otherwise, features that are open to Free-tier usage are also enough to get the main idea behind this process. Additionally, you can get a domain name for free for 1 year from namecheap.com if you get this student pack. I would strongly recommend it.
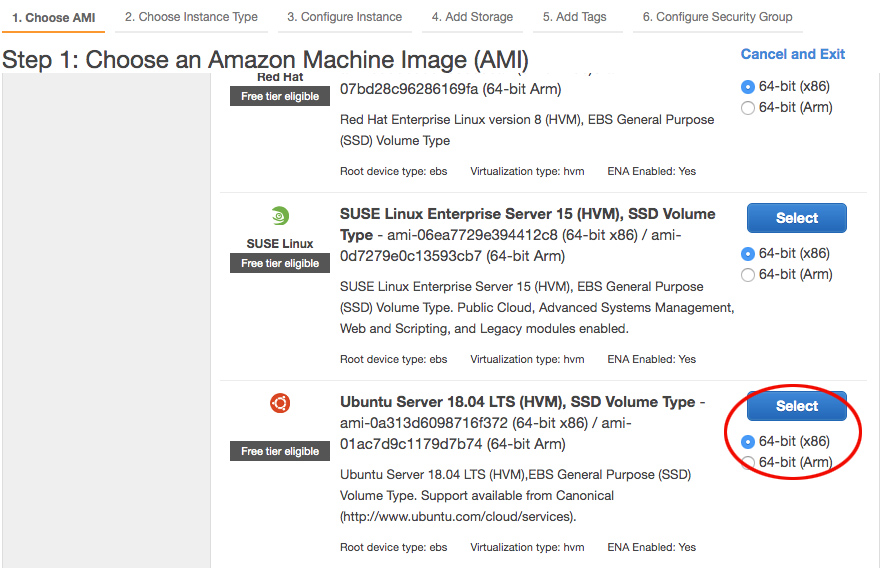
Once everything above is done, let's start with AWS. First make sure that your region is set to N.Virgina (you can set it from upper right part of AWS Management Console). From service dropdown on top-left select EC2 through which we will launch our instance. Click launch instance and then continue with Ubuntu Server 18.04.
In the following page, t2.micro which is selected as default will be our choice to proceed. And then we can "configure the instance details" by clicking next.

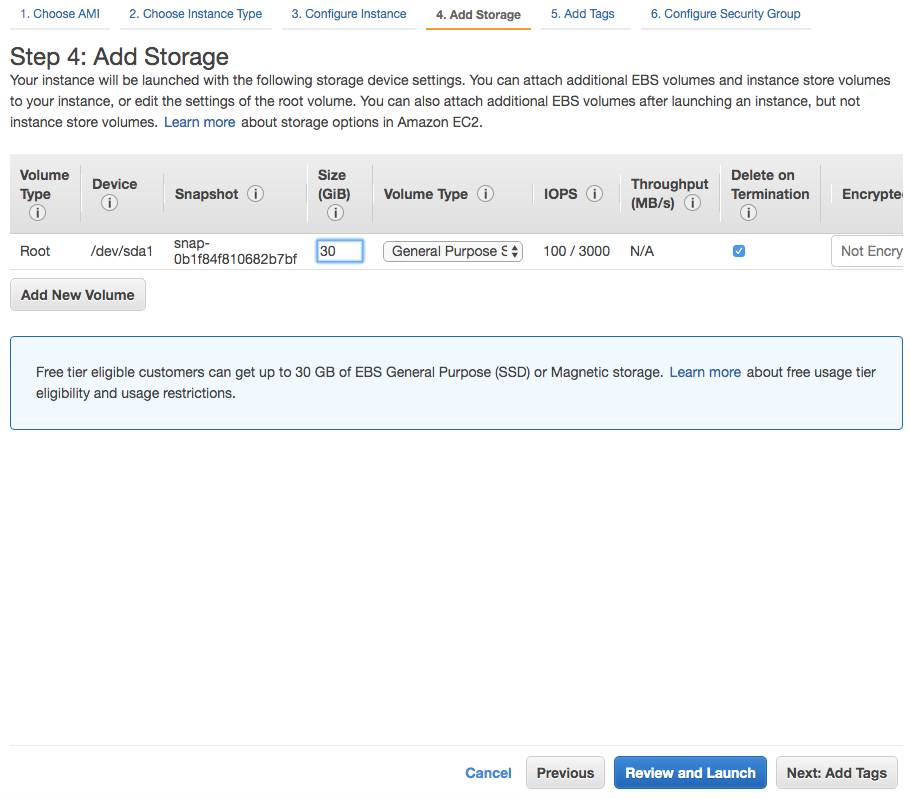
We can leave the following page as is with its default values and proceed to “add storage”. For this part, I would suggest to increase the size of the instance to 30gb which is limit for free tier users.
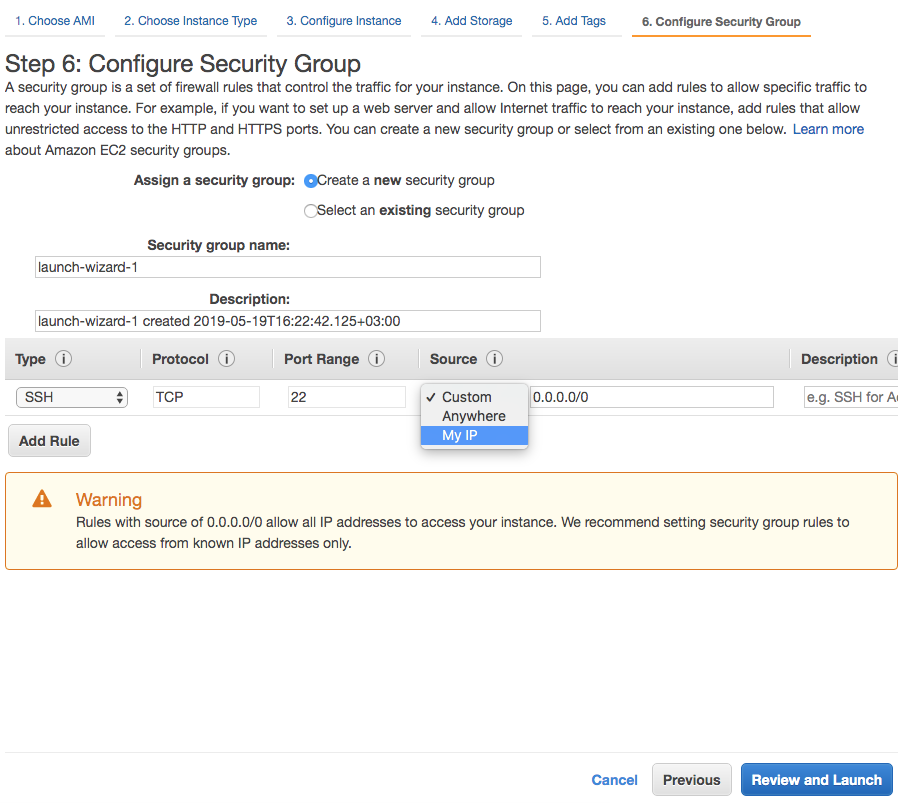
In following page just add some tags you think that will be beneficial to identify this instance in the future and then proceed to “configure security group” page. This is where we will allow type of connections from/to this instance. I would recommend to limit SSH connection to the computers you are using by selecting “My IP” (as highlighted in the image below) from source dropdown. You can still change those rules after launching the instance. If you need to let another computer to access via SSH, just go find security group properties and add it.
After clicking review and launch, we are ready to have a look at the overview right before finalizing the process. Once you've made sure that everything is fine, click launch to initiate the process. You will be prompted to select or create a “key pair” which is required to access the instance via SSH. Select “create a new pair”, name it and download to your computer. Just for the note, in case you might want you access your instance from another computer, keep in mind to store it on a secure cloud storage to download again. AWS S3 might be helpful. Create a bucket and upload it there.
Launching will take a few minutes. In order to check its status, find EC2 from Services dropdown on top left and click running instances from this page. If instance state appears to be “running” then you are ready to go on.
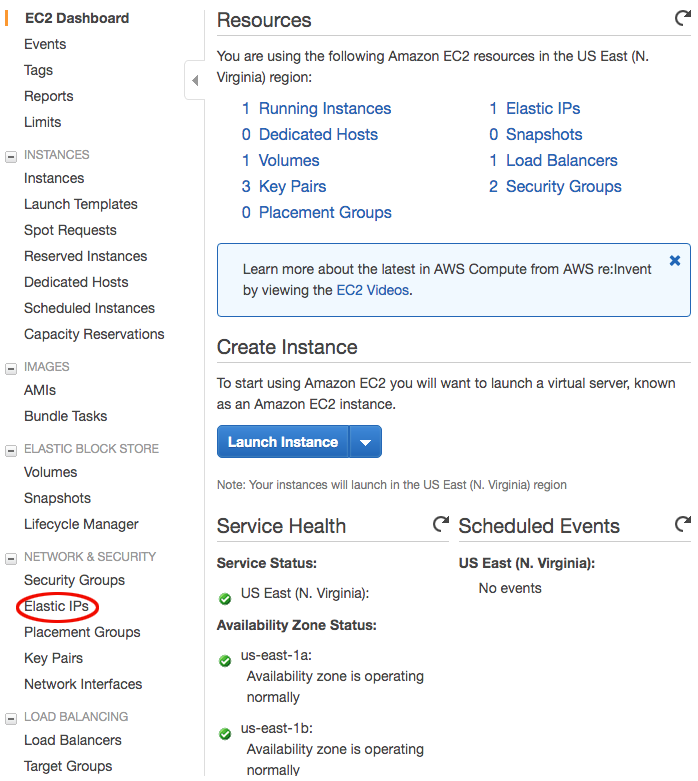
Now, there is one more step before connecting to our instance via shell/bash/terminal/command line interface. We need to allocate and associate an "elastic ip" to our instance. That is a compulsory requirement for being able to point our domain to our instance. In order to access the same page below, click Elastic IPs under “Network and Security” group on your EC2 Dashboard.
Click allocate new address, leave selection as is and click allocate. It is not over yet. Now, on the appearing screen, right click the ip we have just allocated and select “associate address”. Select your instance from dropdown and submit.
When you turned back to elastic ip overview page, now you will see all the columns are filled with new values showing association. Now, we are ready to access our instance via SSH and install PostGIS and Geoserver on it.
Open the existing terminal installed on your computer and keep in mind that you will adjust the key pair path and EC2 instance name coming before amazonaws.com with your own values.
ssh -i /c/pathToYourKeyPair/xyz.pem ubuntu@ec2-YourPublicDNS(IPv4).amazonaws.comThe first one to change is the path on your pc to the key pair you have just downloaded. For the second one, head back to the overview dashboard of your EC2 instance.
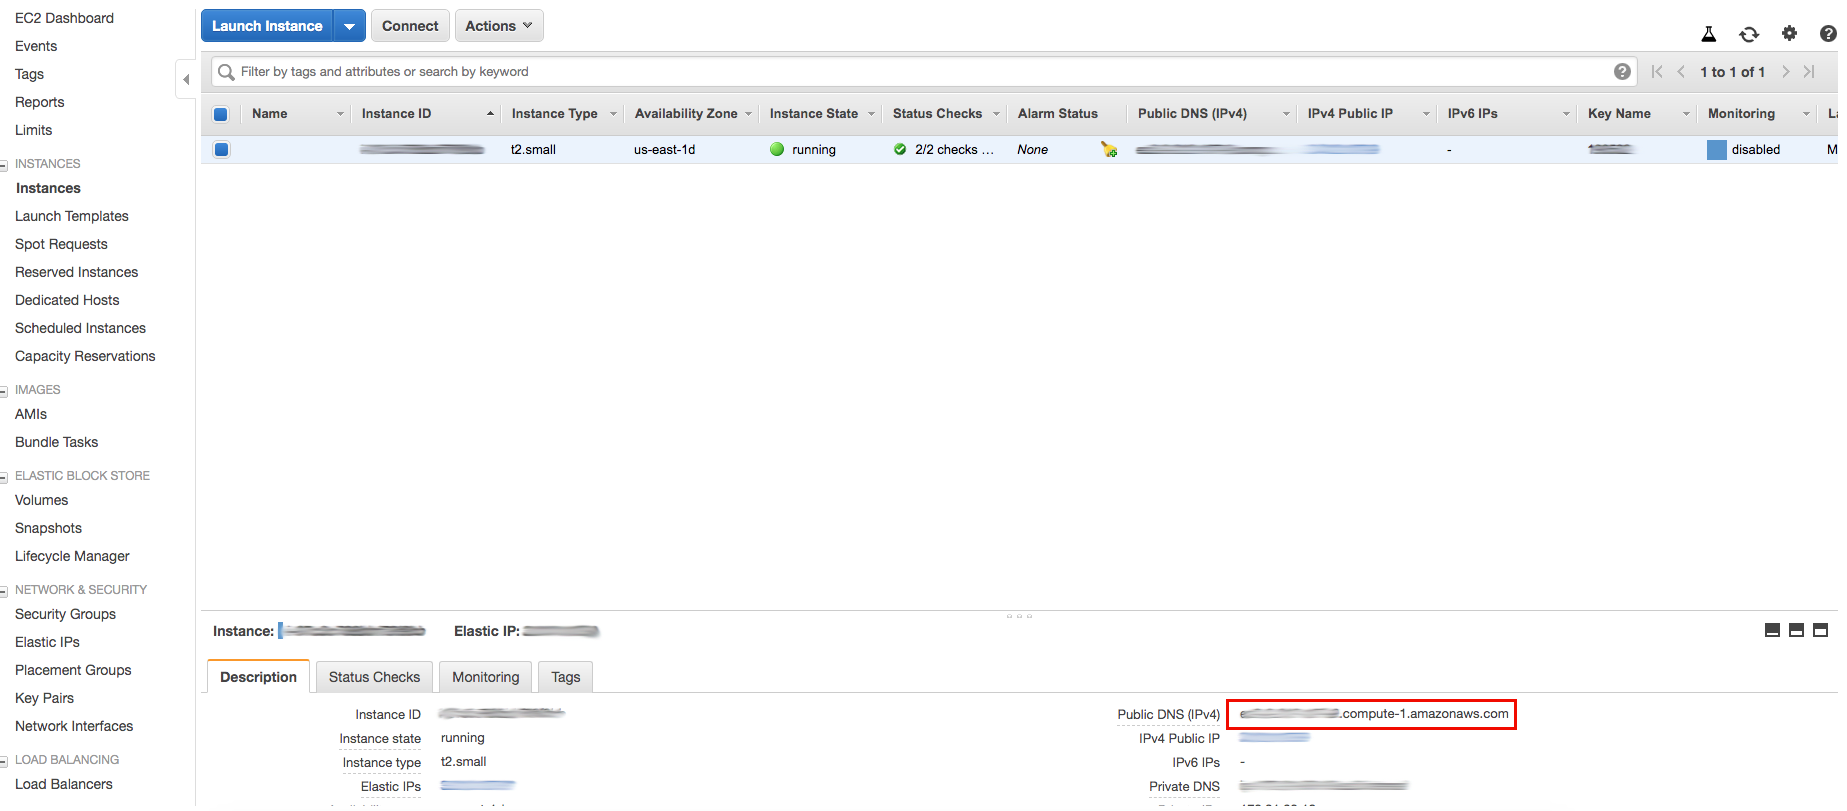
You can find your public dns right bottom of the page as shown image above. Copy/paste it by deleting ec2-YourPublicDNS(IPv4).amazonaws.com part in given command. Once ready, press enter and write “yes” when you are asked if you are sure to continue. Shortly after that, if the last line of command line window starts with something like “ubuntu@...”, that means that everything worked well, you connected to your instance. We can now start installing Geoserver and PostGIS.
Prior to start, you should run the following command in order to update the package list:
sudo apt-get updateNow, we can install openjdk java 8. Enter the following command in your terminal:
sudo apt-get install openjdk-8-jreWe are ready to install tomcat 8, which is a prerequisite for Geoserver:
sudo apt-get install tomcat8Create a folder called “Downloads” and change current directory:
sudo mkdir Downloads
cd /Downloads
Download Geoserver into that directory:
sudo wget http://sourceforge.net/projects/geoserver/files/GeoServer/2.12.3/geoserver-2.12.3-war.zipInstall unzip command and unzip downloaded file:
sudo apt-get install unzip
sudo unzip geoserver-2.12.3-war.zip
Now when you writels -a command you must be seeing a “geoserver.war” file. Next, we’ll move this .war file into tomcat8/webapps :
sudo mv geoserver.war /var/lib/tomcat8/webapps/Change your directory to /var/lib/tomcat8/webapps/ and check if the file has been moved correctly.
Once you've made sure that the file exist in that directory, restart tomcat8 with:
sudo service tomcat8 restartNow you can access Geoserver with http://Public Dns of Your EC2 Instance:8080/geoserver and see it's working.
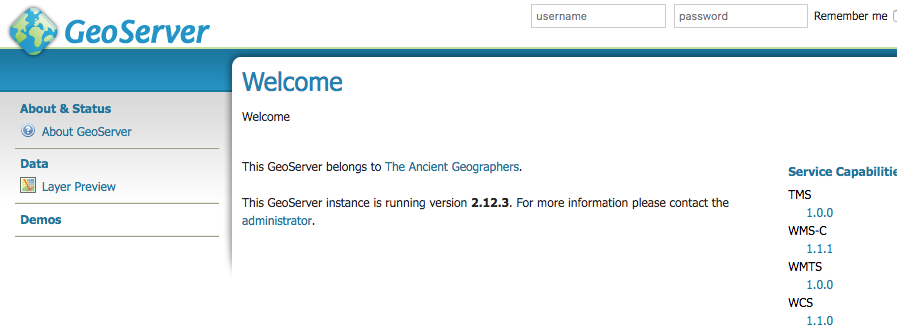
Mostly, geoserver's default administrator credentials are as follows. Login and change the password with something more secure.
Username:admin
Password: geoserver
The thing is that we are trying to build something useful, but at the same time free. So, the memory & CPU capacities of our machine is quite limited. It is pretty prone to crash from time to time, if we try to work with large datasets. Therefore, we will need a little twist for performance improvement, even though this will not guarantee to solve issues completely. We can still experience connection problems, there is only 1gb of memory alongside 1 CPU, most of which is busy with operating the software we installed.
For that reason, even though performance improvement is whole another subject, my advice would be to create a new file called “setenv.sh” at the same location with “catalina.sh” file and fill it as follows, then save it and restart tomcat. This will increase the heap size and help to avoid frequent crashes:
export CATALINA_OPTS="-Xms256m -Xmx1024m"Once again, I would like to remind that, if you are not planning to build something only for self-testing purposes, you should consider to choose a more powerful instance with higher CPU and memory features. Beyond that, there are also other methods that can be applied for performance improvement, yet those are completely out of the scope of this walkthrough.
Next, we can move to the step of installing Postgresql/PostGIS database on our instance. Prior to going ahead, I assume that you already installed a Postgresql DBMS on your PC/Mac. This is a must for easier spatial data handling as it enables us to interact with the DBMS through a well designed interface. If it is not installed yet, it is just a matter of seconds to google and find how to do it. Back to our terminal window, first I would recommend you to change your current directory to home. Then, run another package update and install postgresql:
sudo apt update
sudo apt install postgresql postgresql-contrib
After that we need to install PostGIS with following command:
apt-get install postgis*Now we will set user password and enable PostGIS:
Switch to postgres user:
sudo -i -u postgresActivate psql command line interface:
psqlJust before creating PostGIS extension, another important step is to set your password that you will be using while connecting to database
sudo -u postgres psql postgresNow we can create PostGIS extension:
CREATE EXTENSION postgis;Now we have a spatially enabled DBMS. You can create other required extensions in a similar way. Keep in mind that \q will help you to quit.
Important step here is to adjust the configuration documents of Postgresql in order to be able to access it through the local pgAdmin we installed on our computer. With that aim, we need to uncomment and change #listen_addresses=‘localhost’ to listen_addresses=‘*’ in file /etc/postgresql/10/main/postgresql.conf. Keep in mind that your .conf file might be at a different location. So if copy&paste the one I wrote here didn't work, try sudo locate postgresql.conf to find yours. Also, we need to add this line host all all all md5 into the file /etc/postgresql/10/main/pg_hba.conf which will allow all the incoming connection requests to the database. In order to edit those files, you can use the nano comand:
sudo nano /etc/postgresql/10/main/postgresql.confWe have installed everything we need so far. The second part will be about linking our instance to our domain and securing it with a SSL certificate. From AWS services search and find AWS certificate manager. Click "get started" on the certificate home page.
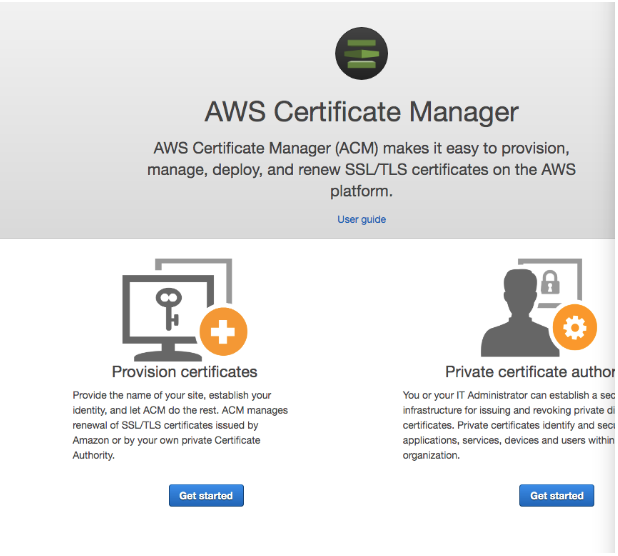
Then request a public certificate.
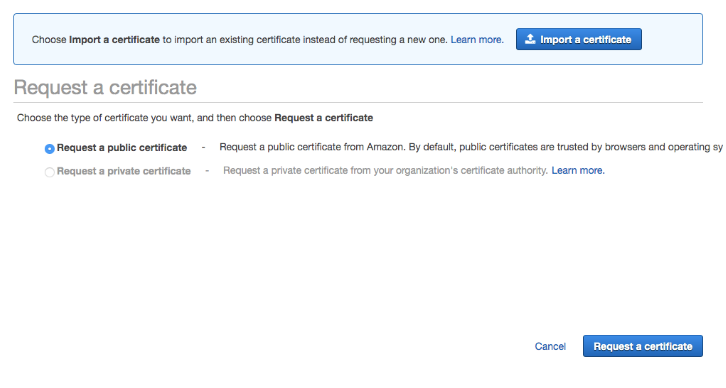
Fill in your domain name in the explained way on that screen. Put an asterisk * to the beginning. In other words, if your domain has a name like klmn.com , you should write it like *.klmn.com
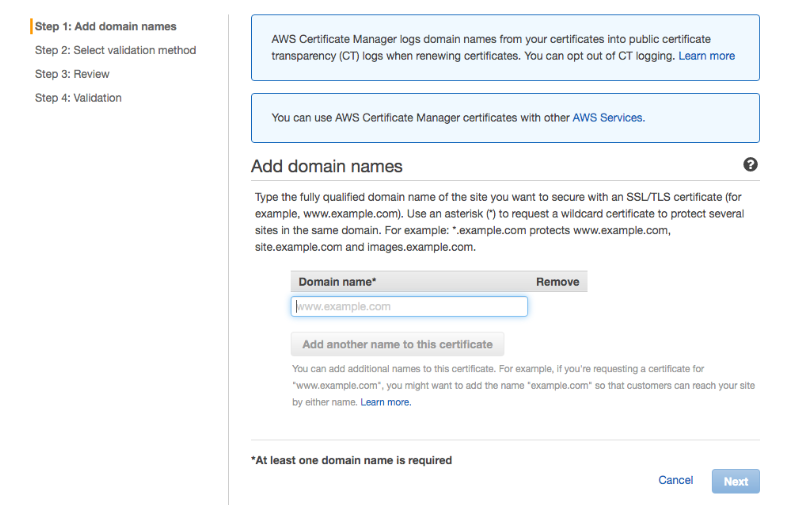
For the validation, I would prefer DNS validation. We will just download a text file including dns settings. Copy&paste them to settings of our domain. For the following pages continue clicking next until you reach certificates overview.
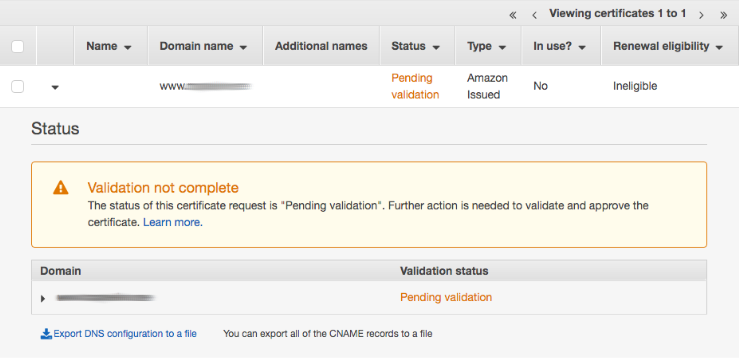
Click "export dns configuration to a file" on this page. Open downloaded csv file with a text editor installed on your computer.
Keep it open for a moment and login to your domain management board. As I mentioned before, mine is registered via namecheap and it is possible to view all domains by clicking on domain list.
From there, click advanced DNS. You should be seeing something like below.
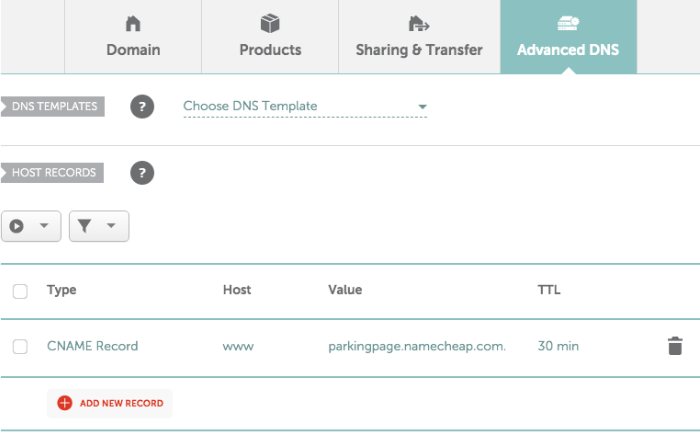
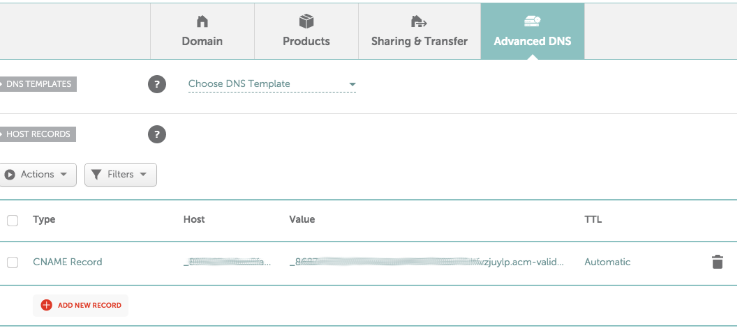
Delete the existing records by clicking trash bin symbol at the right. Then add your dns settings coming with csv file we have just downloaded as I shown in the image below. Pay attention to copy everything including underscore _ . Another important thing to mind is removing the domain name from “Name”. Only the value before dot has to remain. Based on imaginary values, just remove .klmn.com from _3473873hfh5dhngf82374f.klmn.com and paste only the value _3473873hfh5dhngf82374f under Host. Next, copy Value and paste it as is under Value section on your advanced dns settings screen in namecheap.
After all, you should be looking at something like below on your domain settings dashboard.
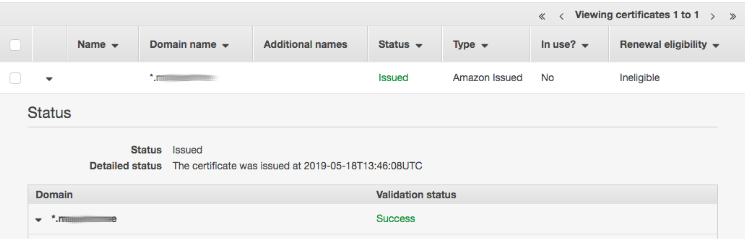
Wait for a few seconds and refresh your AWS certificate management board. You will see that it is validated, which means that now we are done with SSL certification for our domain.
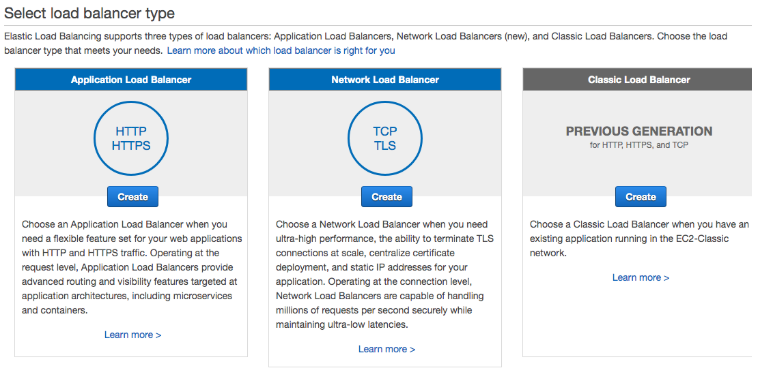
Now we will be creating a load balancer. Proceed to your EC2 instance dashboard. Down on the left pane, you will see load balancing section. Click load balancers and create load balancer. Select “Application Load Balancer”.
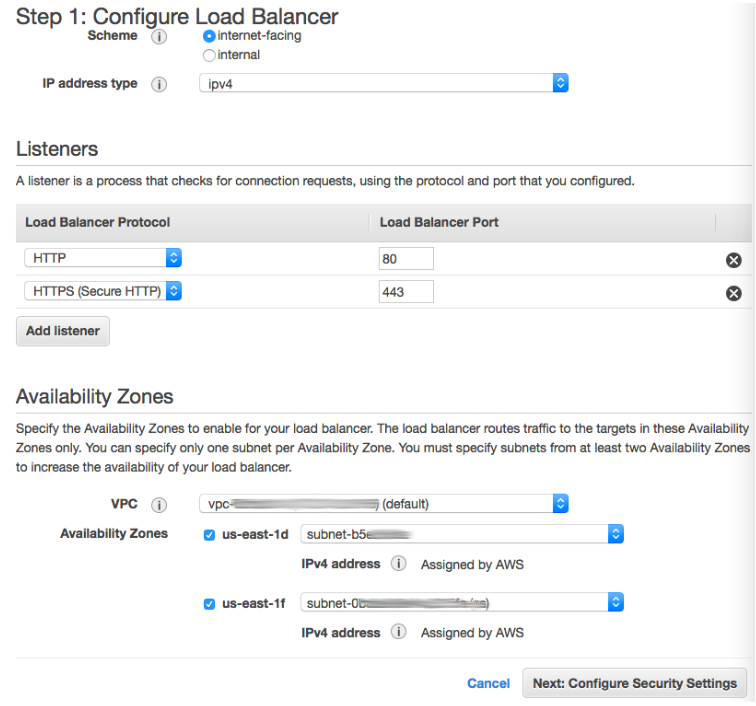
Name it as you wish. Add a HTTPS listener just below HTTP and check availability zones. After that your are set to click next.
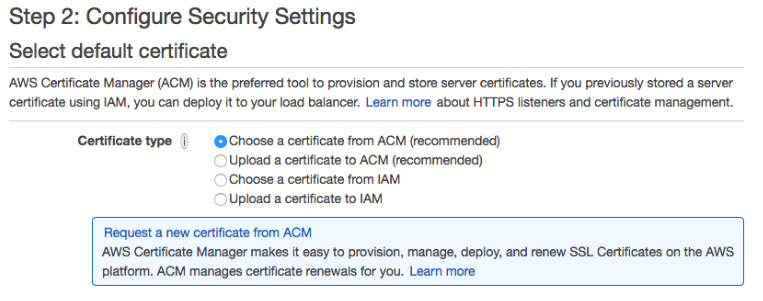
On the following page just select (if not selected as default) the 1st choice which is “Choose certificate from ACM”.
At step 3, figure out your security groups in a way that will allow public access to web site. Proceed to step 4. The important thing at this step is to correctly fill in the port box. It should be 8080.
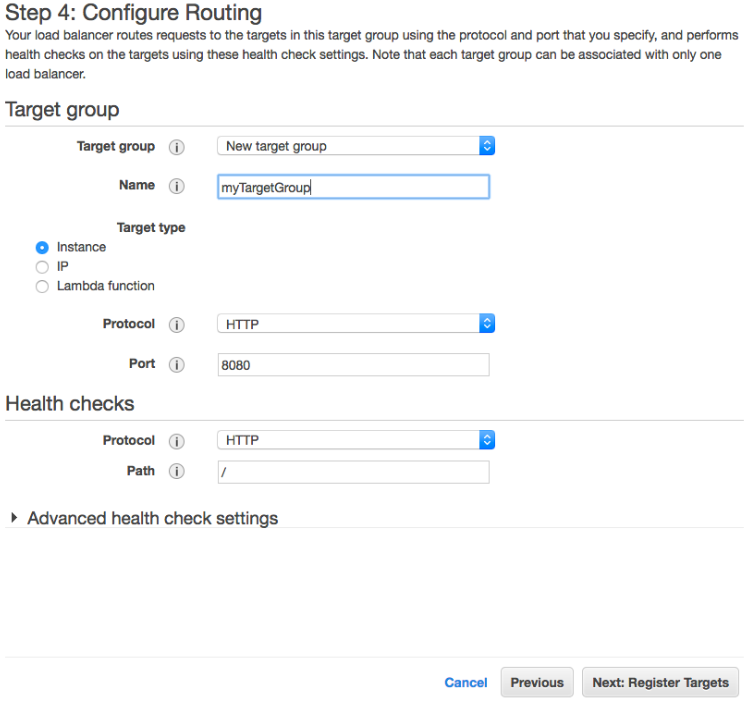
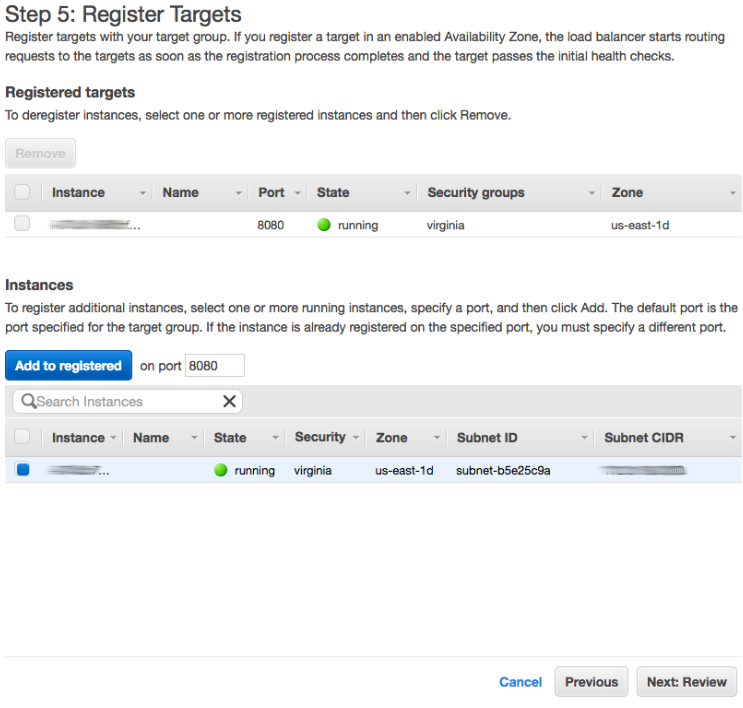
Again click next and select instance to add it to registered targets. Just click add registered, we are set. Review all and create. That is it, we configured load balancer and target groups.
The last step, is to link our domain to our AWS instance. We will be doing this with help of Route 53 service of AWS. Head to Route 53 then create a hosted zone for your domain. Let’s say again we are working with imaginary klmn.com. I would suggest you to type it with no www at the beginning.
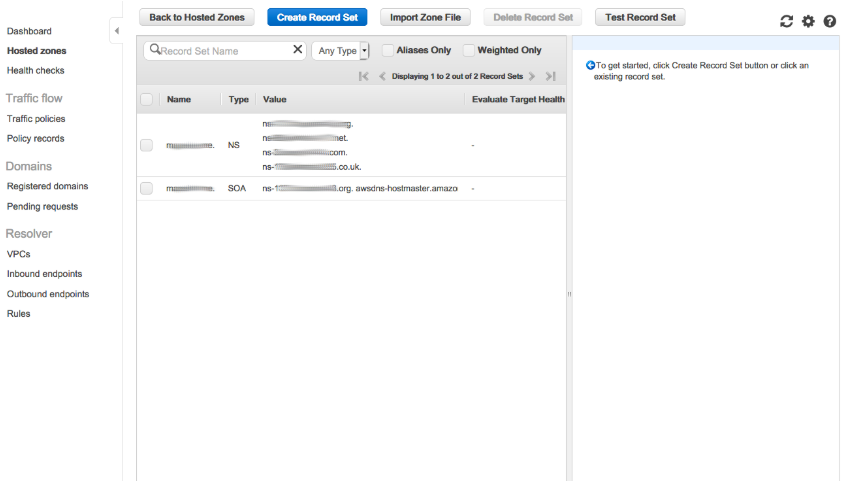
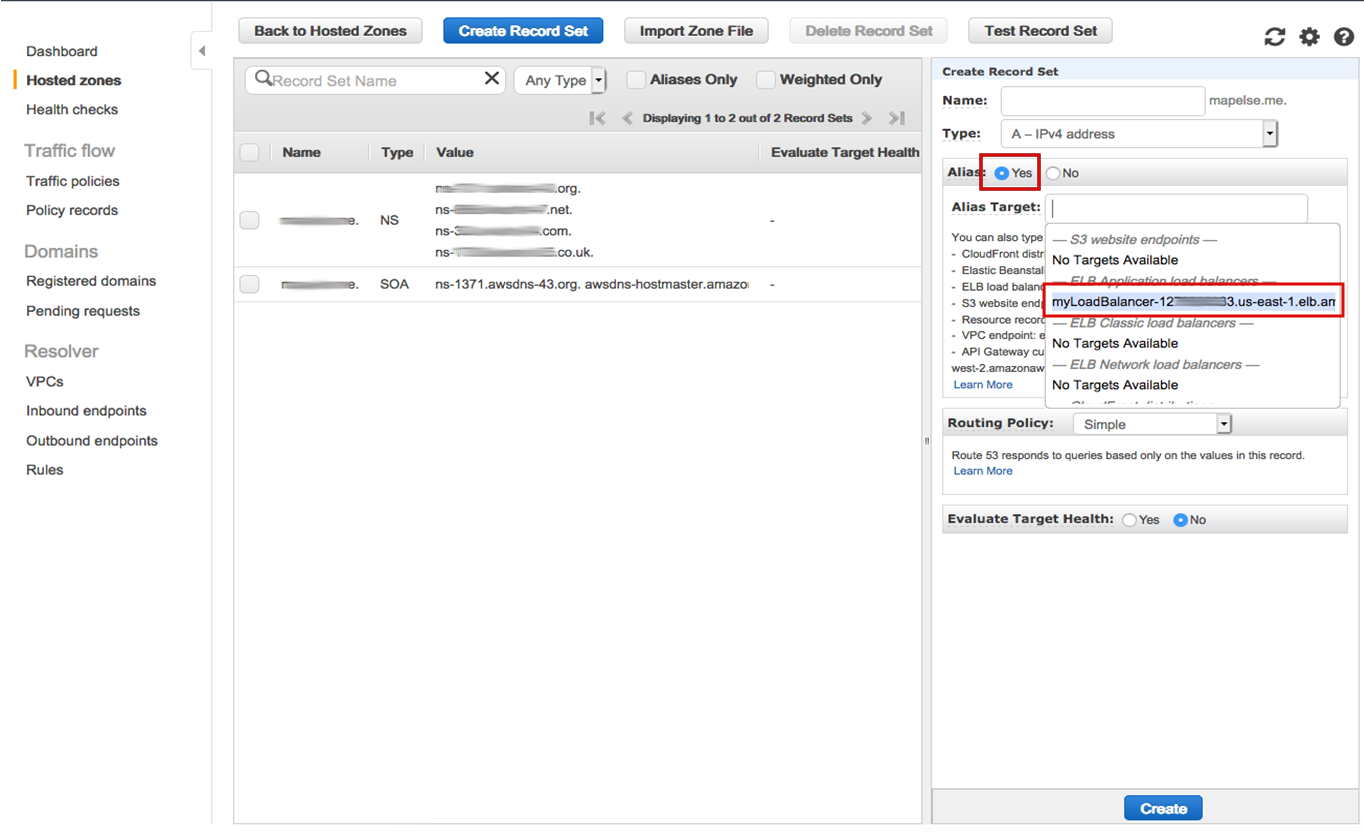
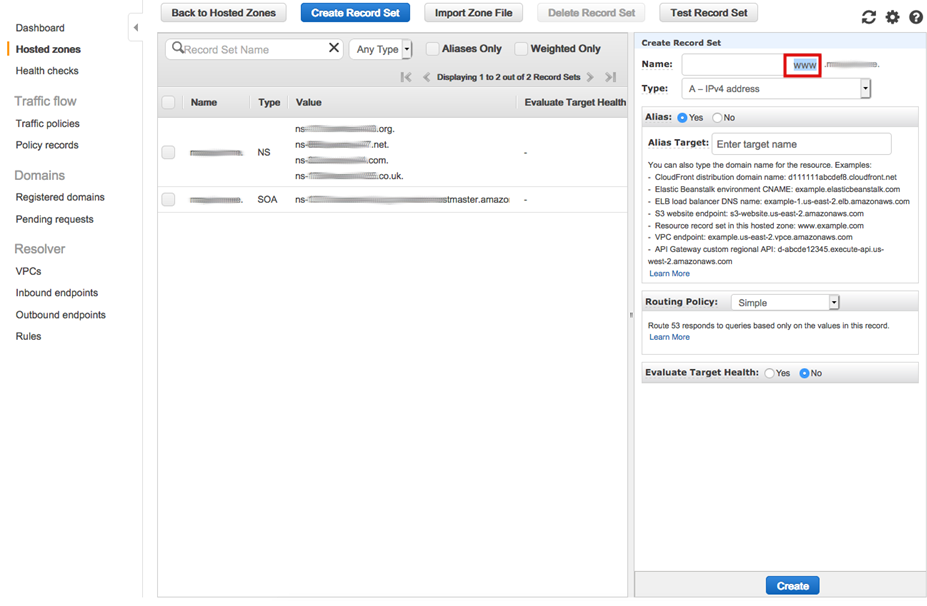
Now you should be seeing a screen like above. With NS and SOA values shown for your domain. But we still need two other record sets. Click create record set. For the first one, leave the name box empty as is, select yes for Alias. We will see a new option appeared called Alias Target offering several other options. Look for your instance’s load balancer, select it and click create.
Create another record set, follow the very same steps, only difference is that this time we have a “www” addition in name box (shown below).
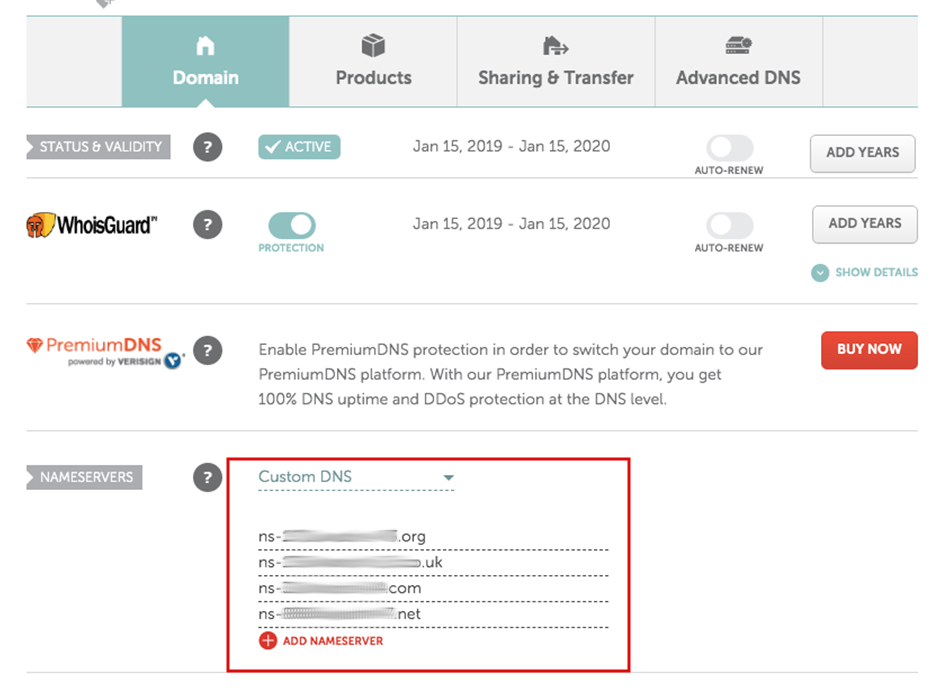
Now we can copy NS values to our domain’s name server settings. Just like the example below, select custom dns and paste the values you copied from AWS’ hosted zones screen.
We are set. At that point, what I am going to suggest you is access to your geoserver admin page via your own instance’s address.
http://ec2-xxxxxxx.compute-1.amazonaws.com:8080/geoserver/web/Then, go directly to global settings. Fill in your Proxy Base URL in the empty box. Back to our example address, it should be something like:
https://www.klmn.com/geoserver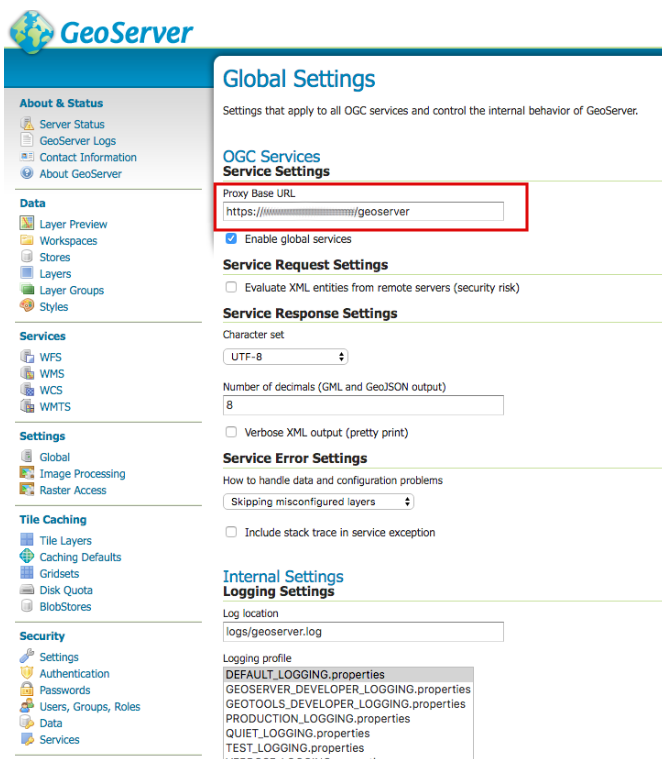
THAT’S IT. Now you have your own free geo-stack running on AWS through free SSL enabled connection.

Please keep in mind that this geospatial stack experimental and you should be checking your usage limits on AWS. Another thing to pay attention is that, the SSL certificate requires renewal after a certain period of time.
Another suggestion for taking this walkthrough one step further might be building PostGIS and Geoserver through Docker. This might help to configure/maintain things even faster.
In case of a question or suggestion or any other request you can contact me via my e-mail/linkedin.
REFERENCES
https://www.digitalocean.com/community/tutorials/how-to-install-and-use-postgresql-on-ubuntu-18-04
http://www.donmeltz.com/open-source-spatial-data-processing-suite/
https://stackoverflow.com/questions/6398053/cant-change-tomcat-7-heap-size/10950387#10950387
https://geoserver.geo-solutions.it/edu/en/adv_gsconfig/parameters.html
http://docs.geonode.org/en/master/tutorials/advanced/geonode_production/production.html